
The MovieMaker-Pro is available for check out and holds.
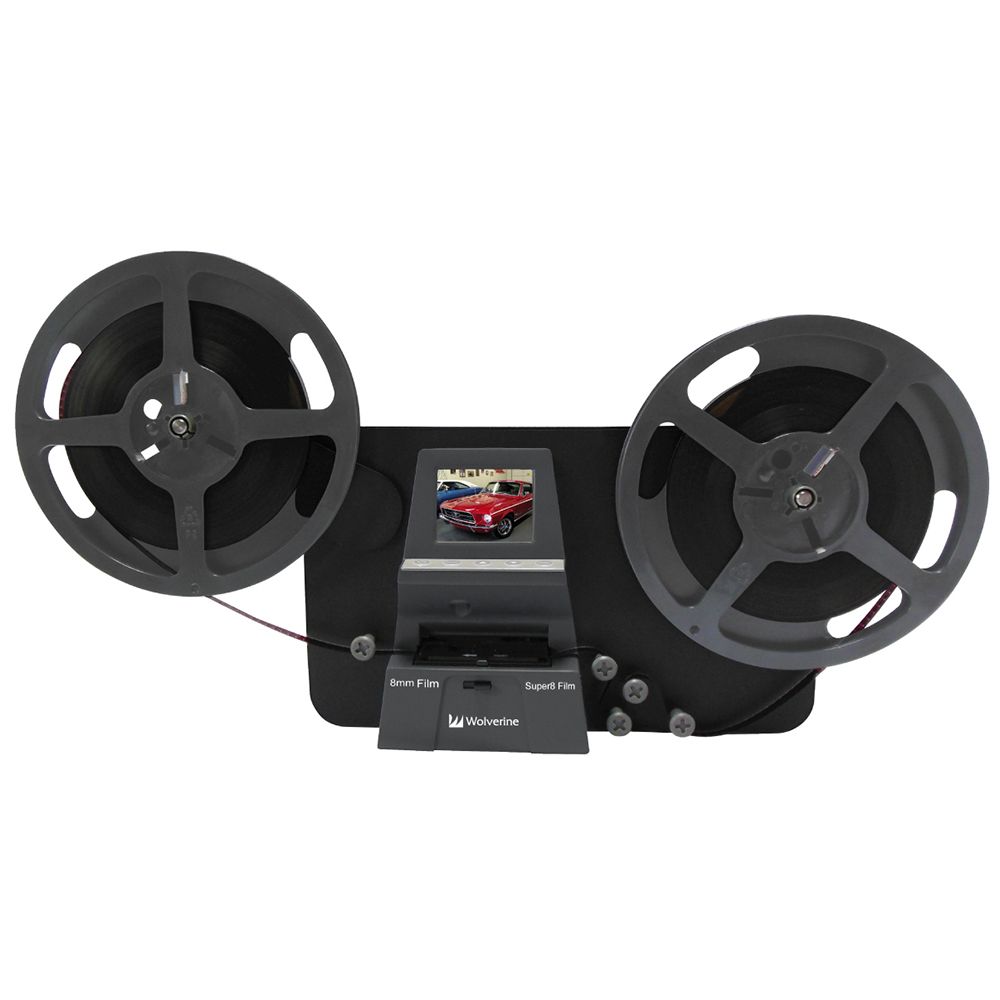
Steps to Convert Film Using the MovieMaker-Pro
With the MovieMaker-Pro you can digitize 8mm and Super 8 films! Let's get started!
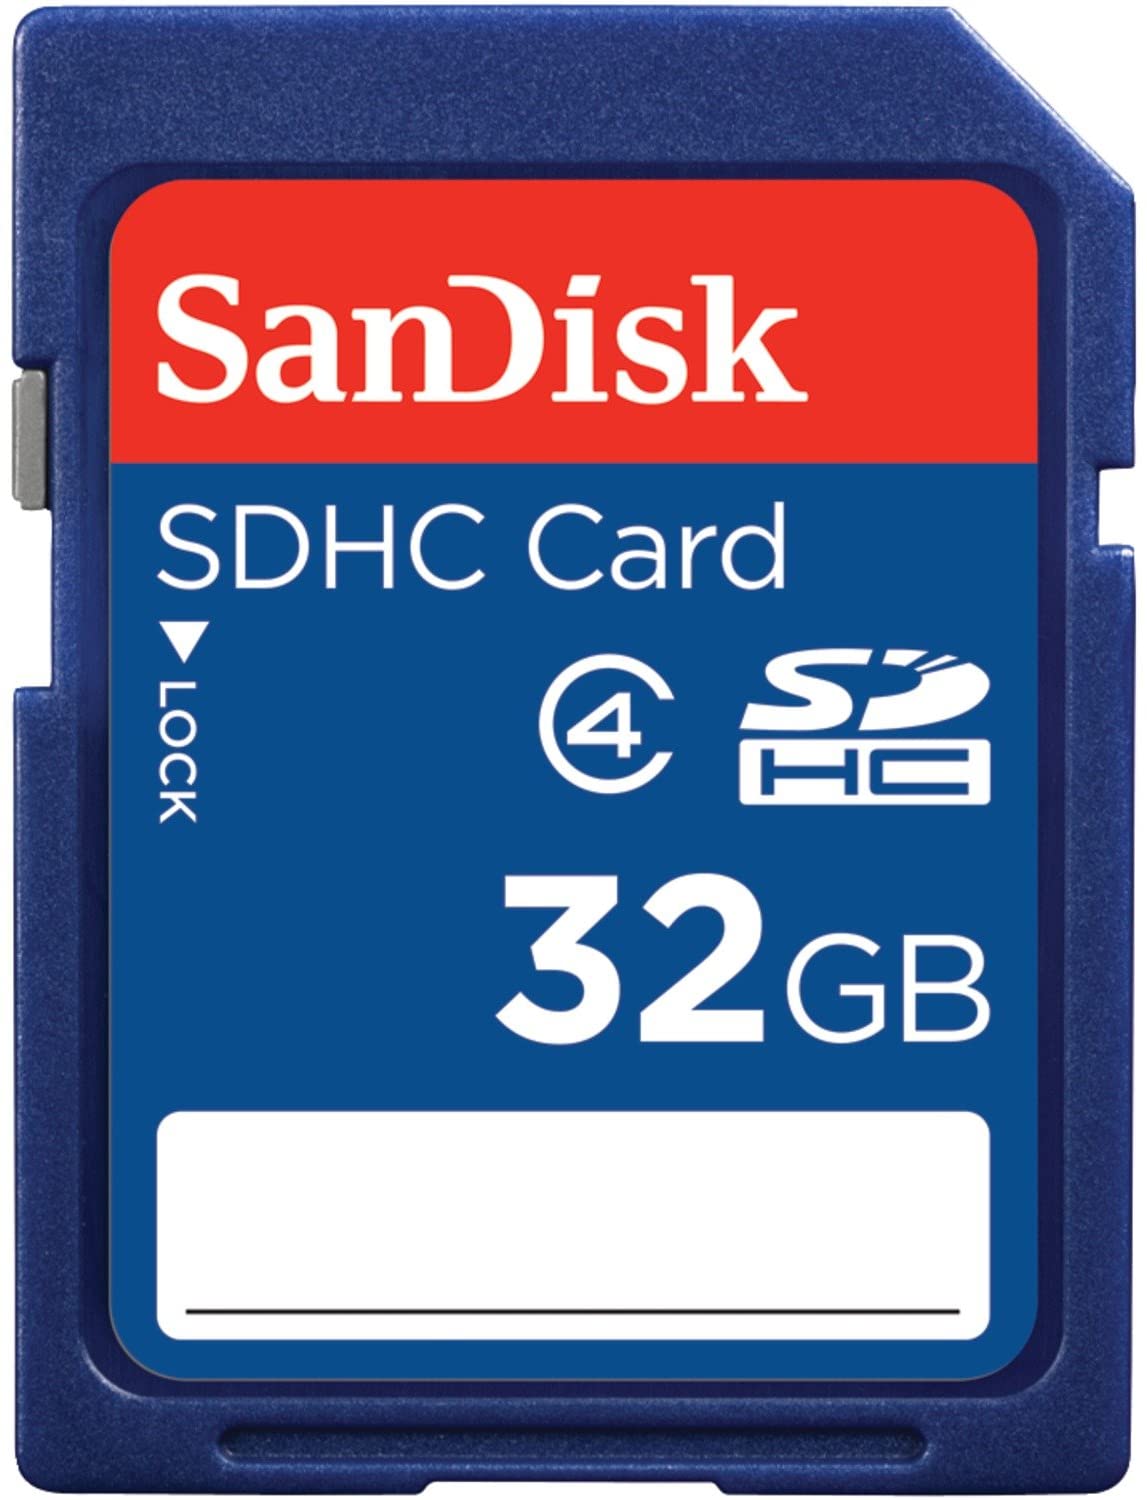
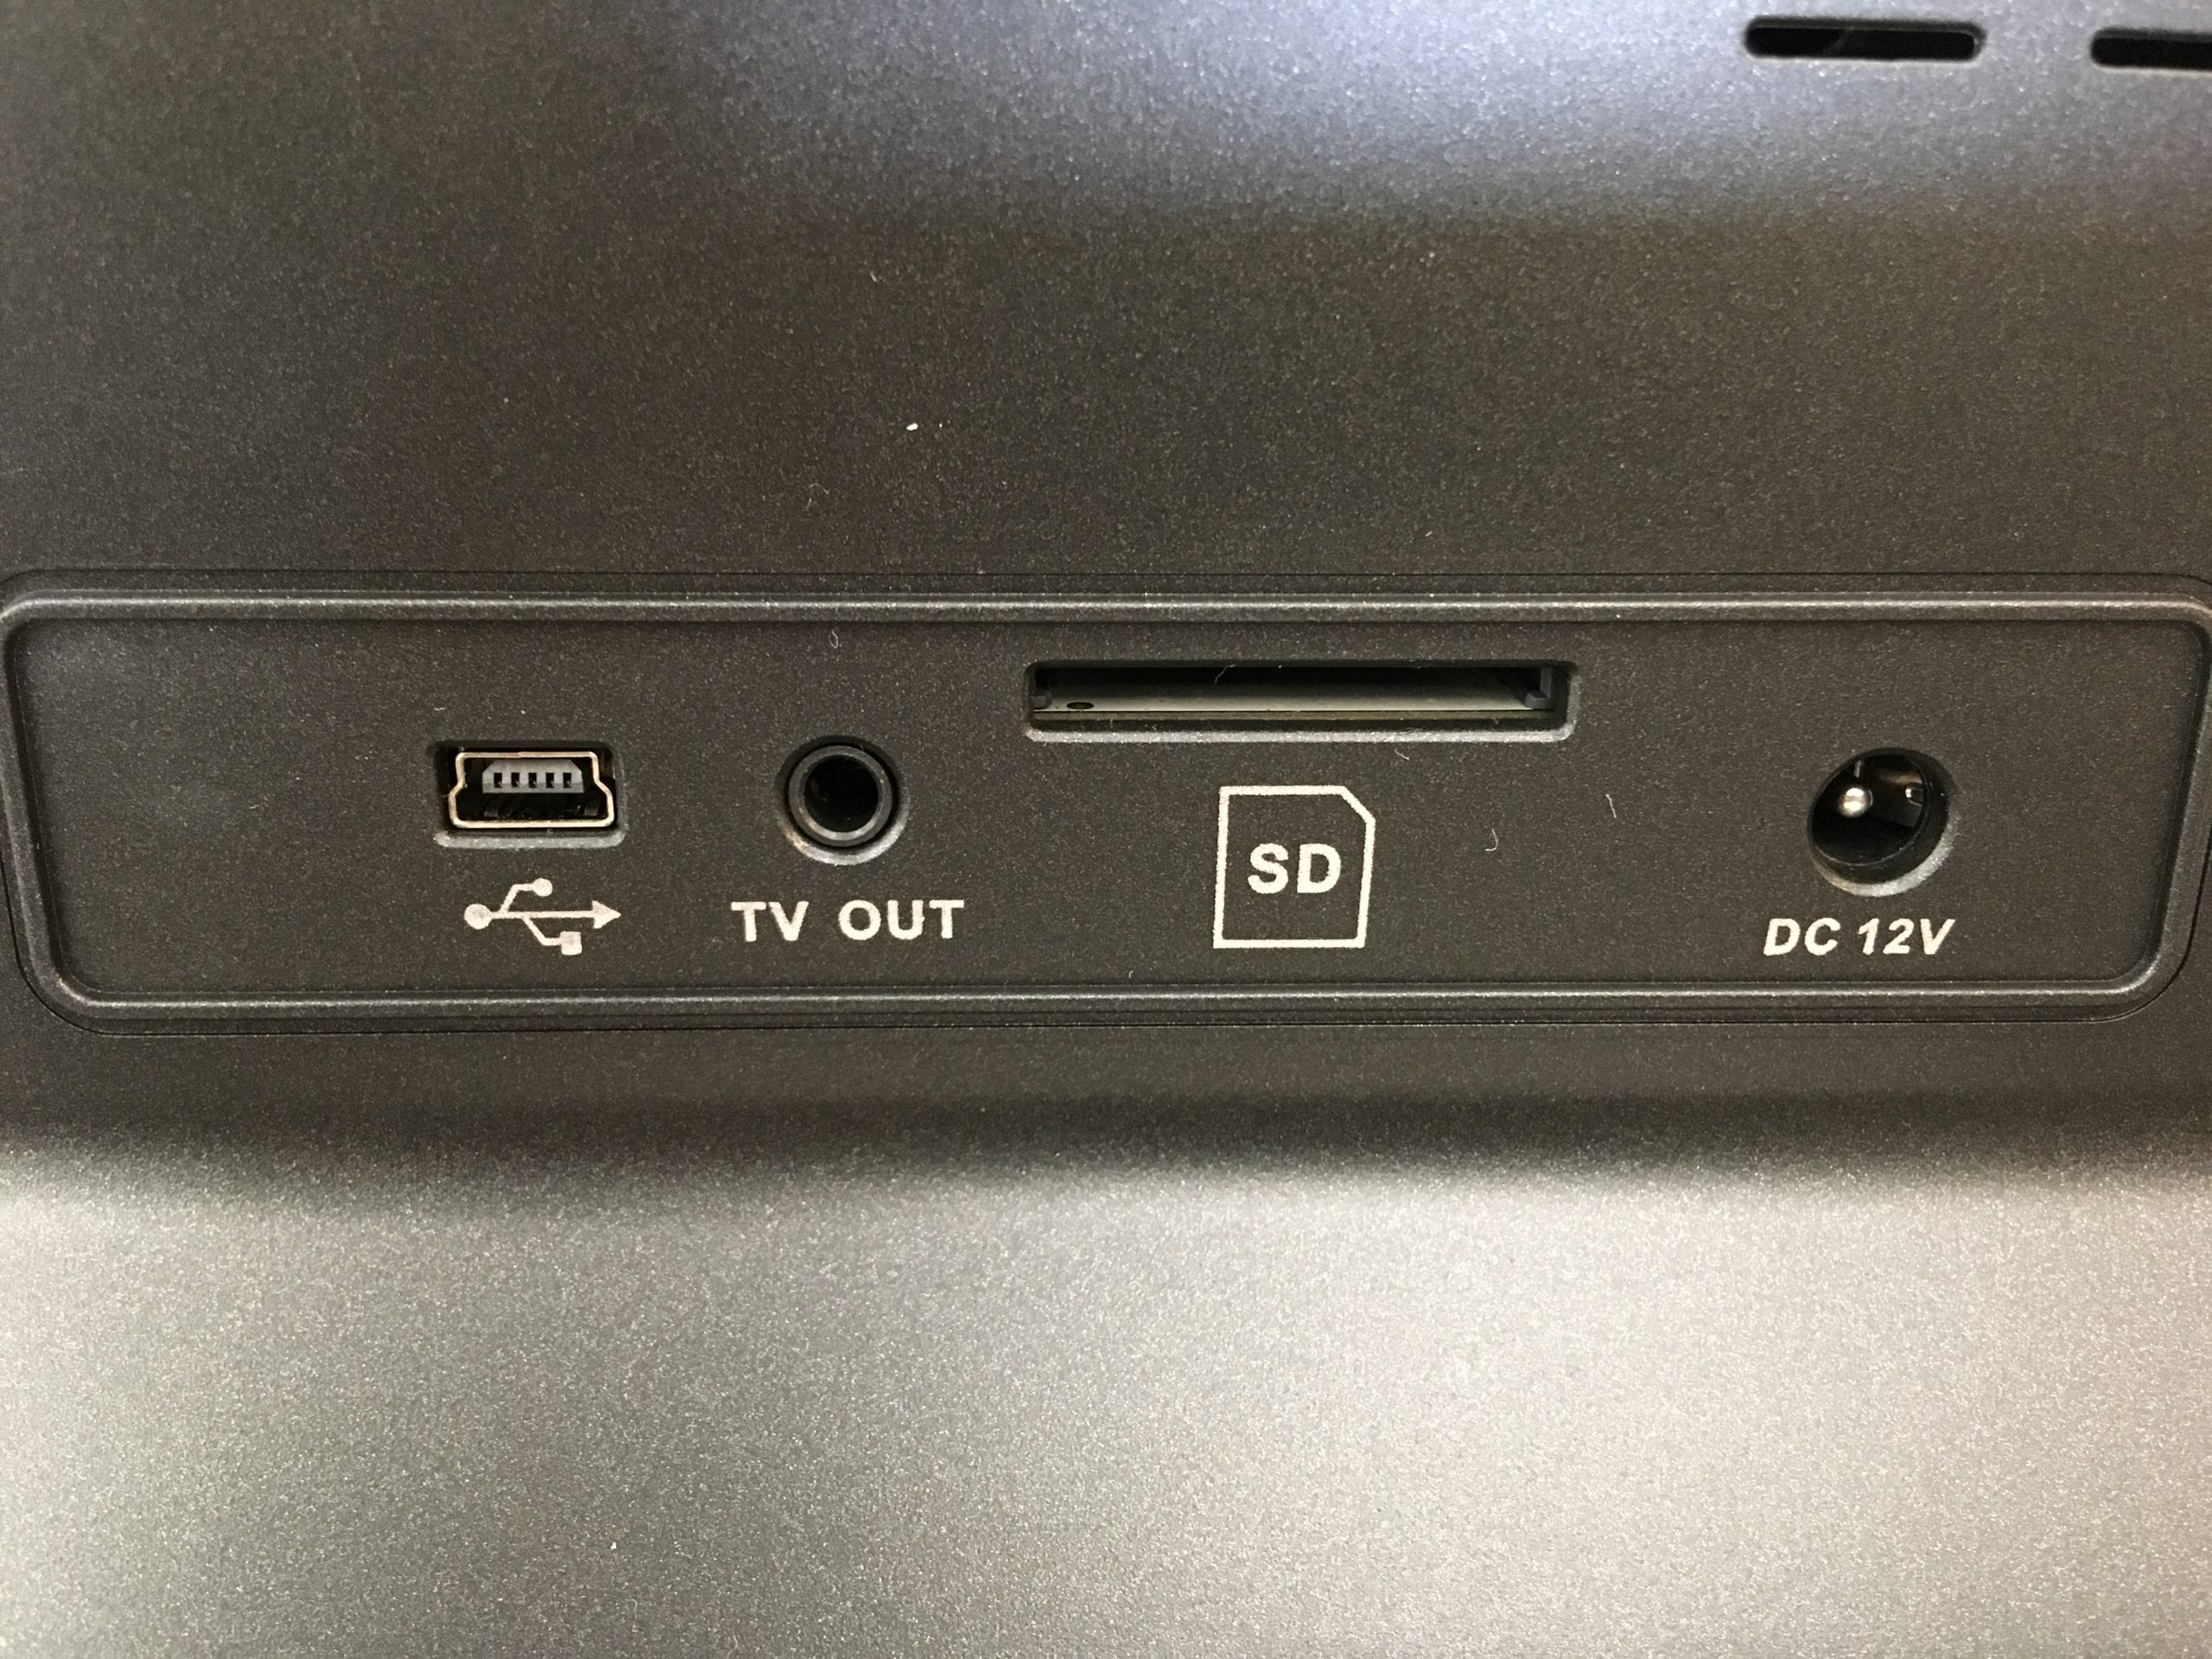
- First and most important, you will need a 32GB SD card to use the MovieMaker-Pro. The device will not turn on unless an SD card is inserted in the back of the machine (insert with label facing up). Note also that if you remove the SD card while the MovieMaker-Pro is on, it will power off.
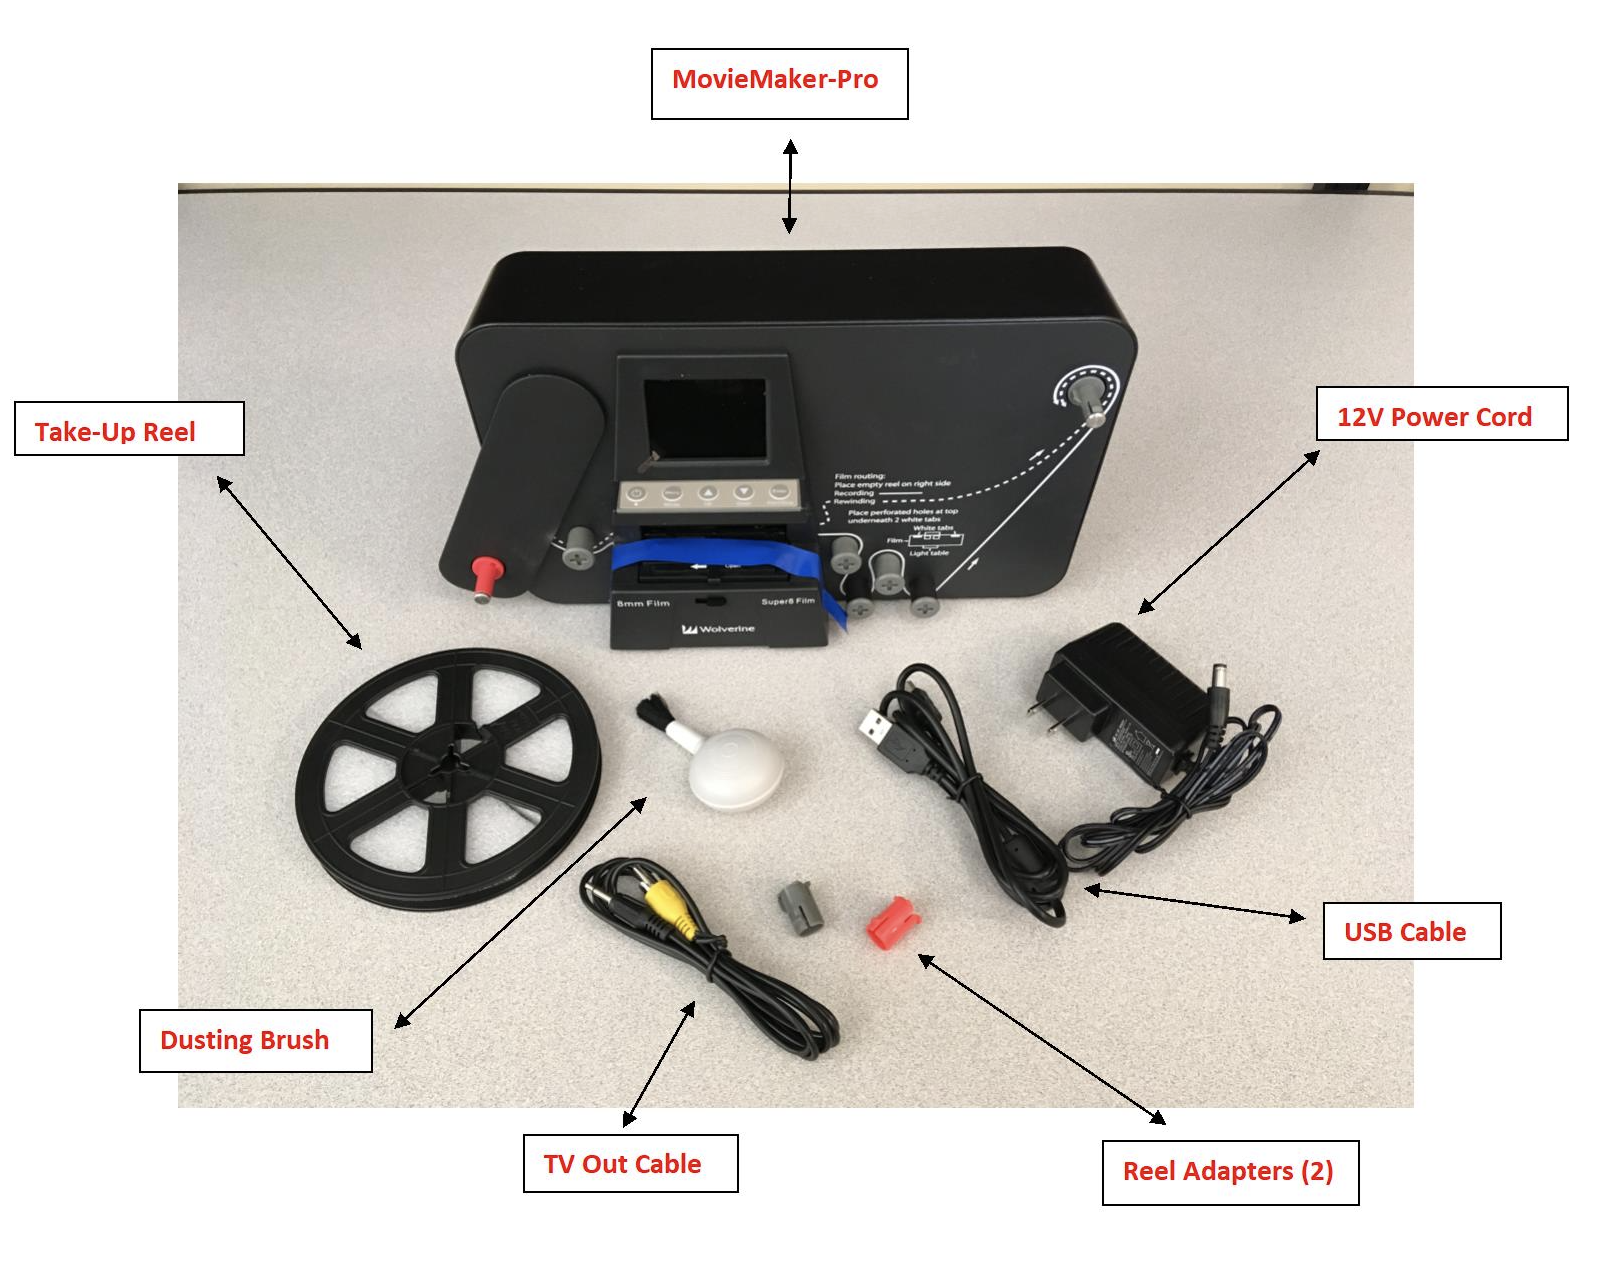
2. MovieMaker-Pro comes with various accessories. All of the items pictured below should be included with the MovieMaker-Pro device.
3. Begin by swinging up the arm to mount your film reel (note the arrow in the picture below)
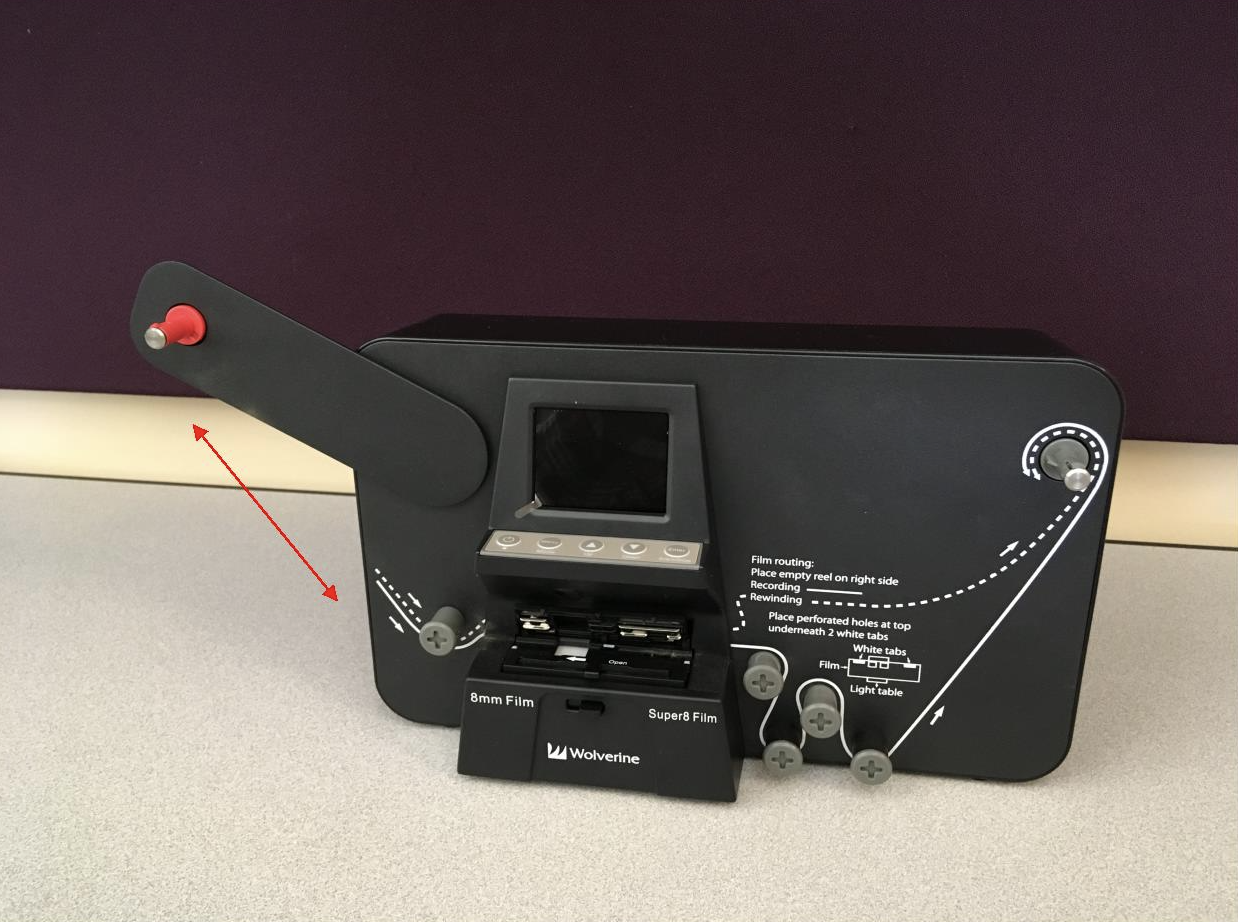
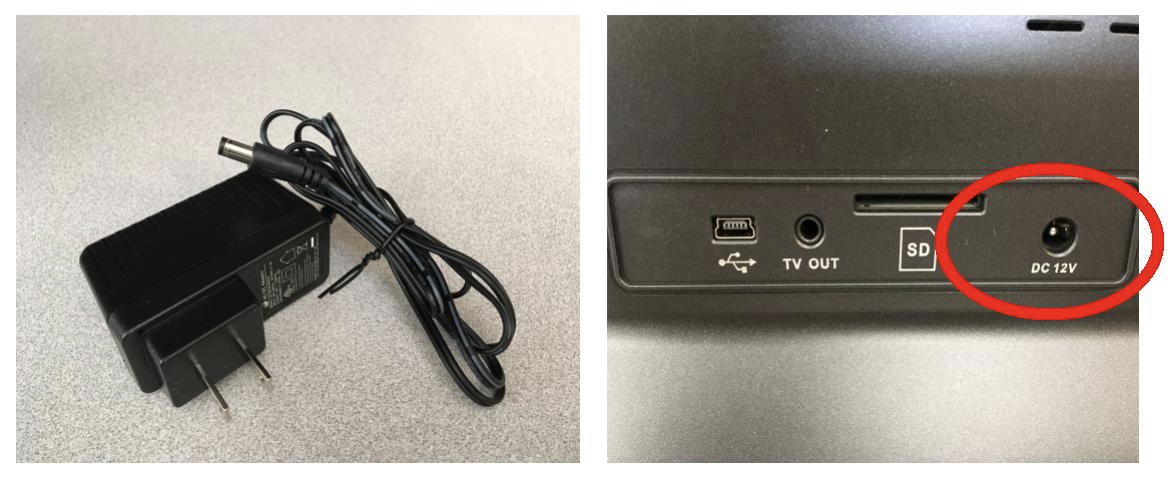
4. Time to power up! Plug one end of the DC 12V power cord (below left image) into the DC 12V power port on the back of the MovieMaker-Pro (circled in red below right image). Plug the other end into a nearby electrical outlet.
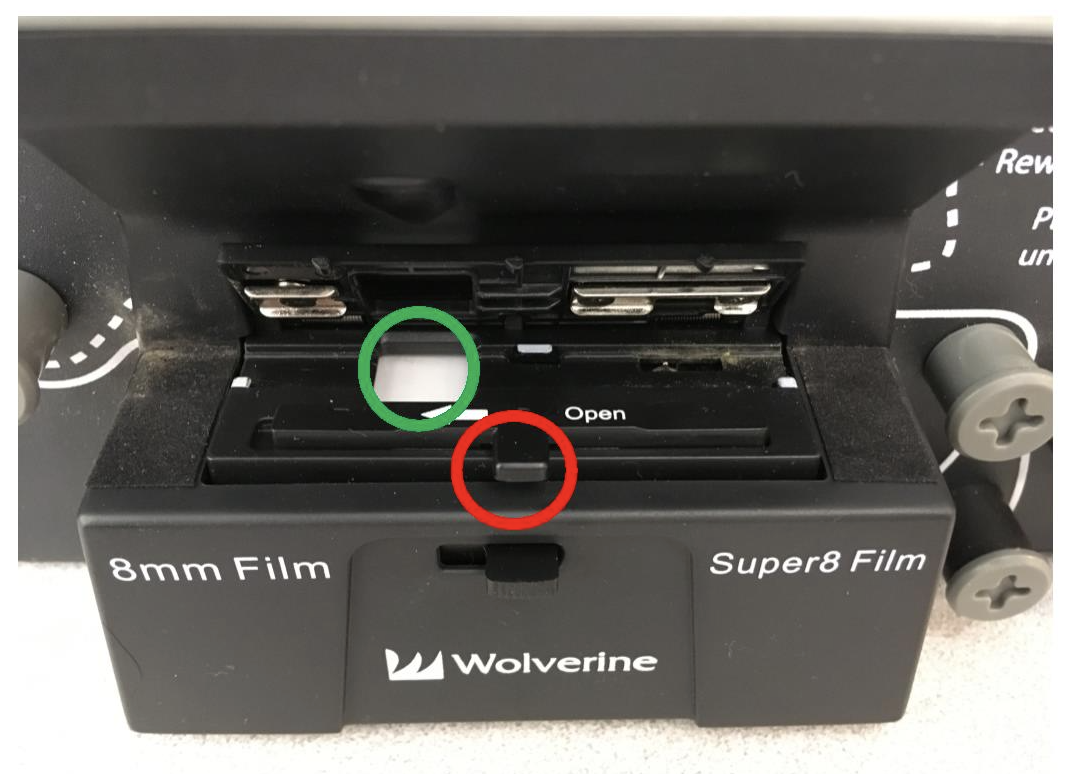
5. Now, slide the film door tab left to flip open the film door (red circle). Use the small brush to clean off any debris that might be on the film glass (green circle).
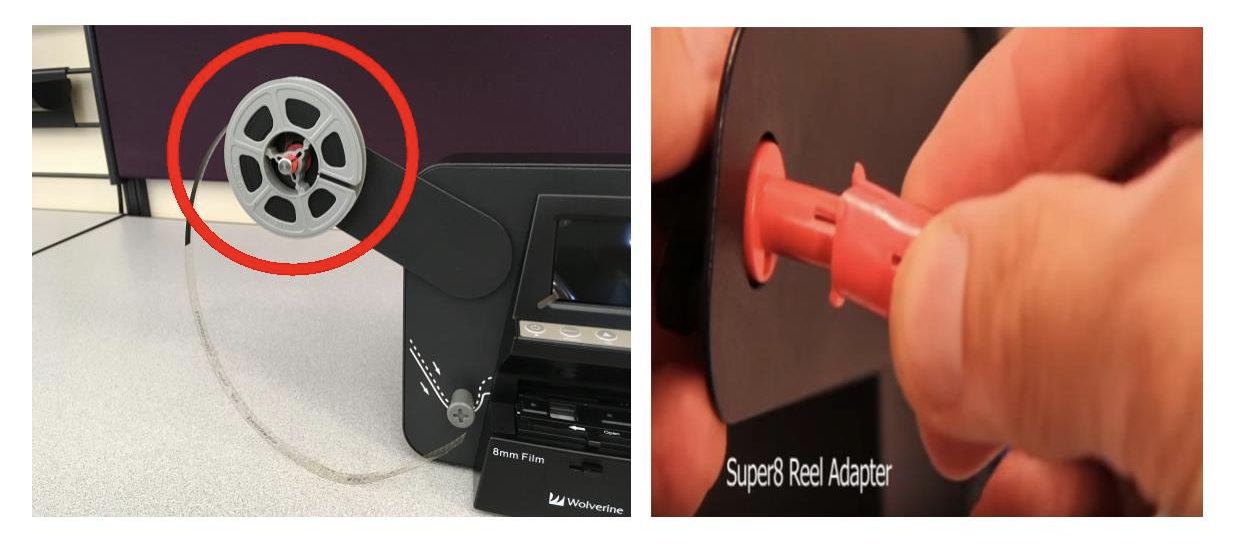
6. Now you are ready to mount the film reels. The film reel you brought in to be digitized will mount to the sprocket on the left (circled in red below left). If your film is an 8mm film, mount the film directly to the shaft. If you are digitizing Super 8 then slide the red adapter over the red shaft first (pictured below right), then mount your film reel. NOTE: Your film reel will rotate and unroll counter-clockwise as pictured below left.
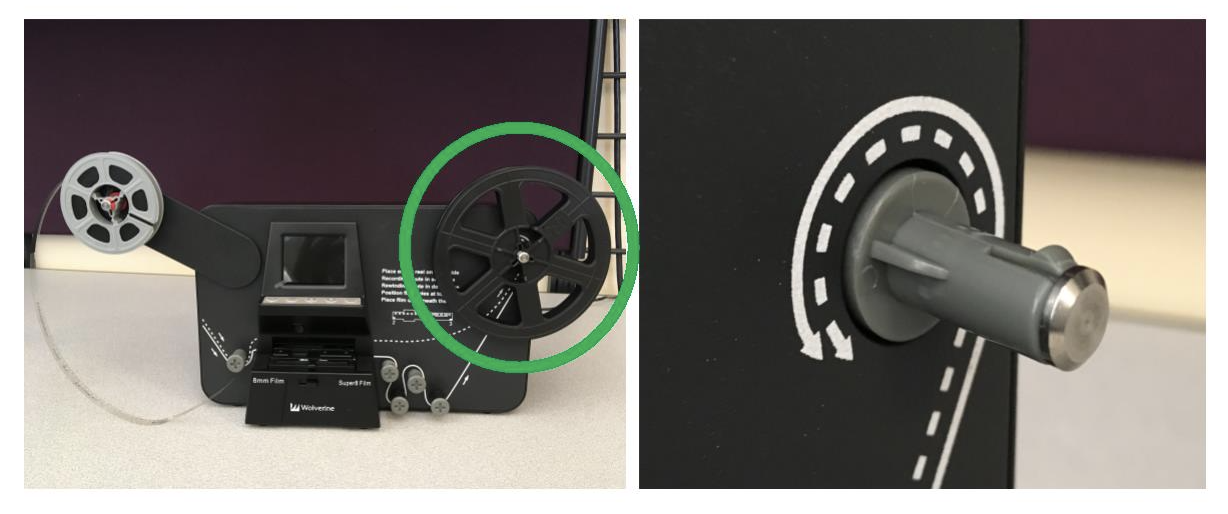
7. The empty film reel (called a “take-up reel”) that comes with the MovieMaker-Pro will attach to the shaft on the right (circled in green below left). Note the fin on the grey sprocket (bottom right image). The “take-up reel” slides over this fin.
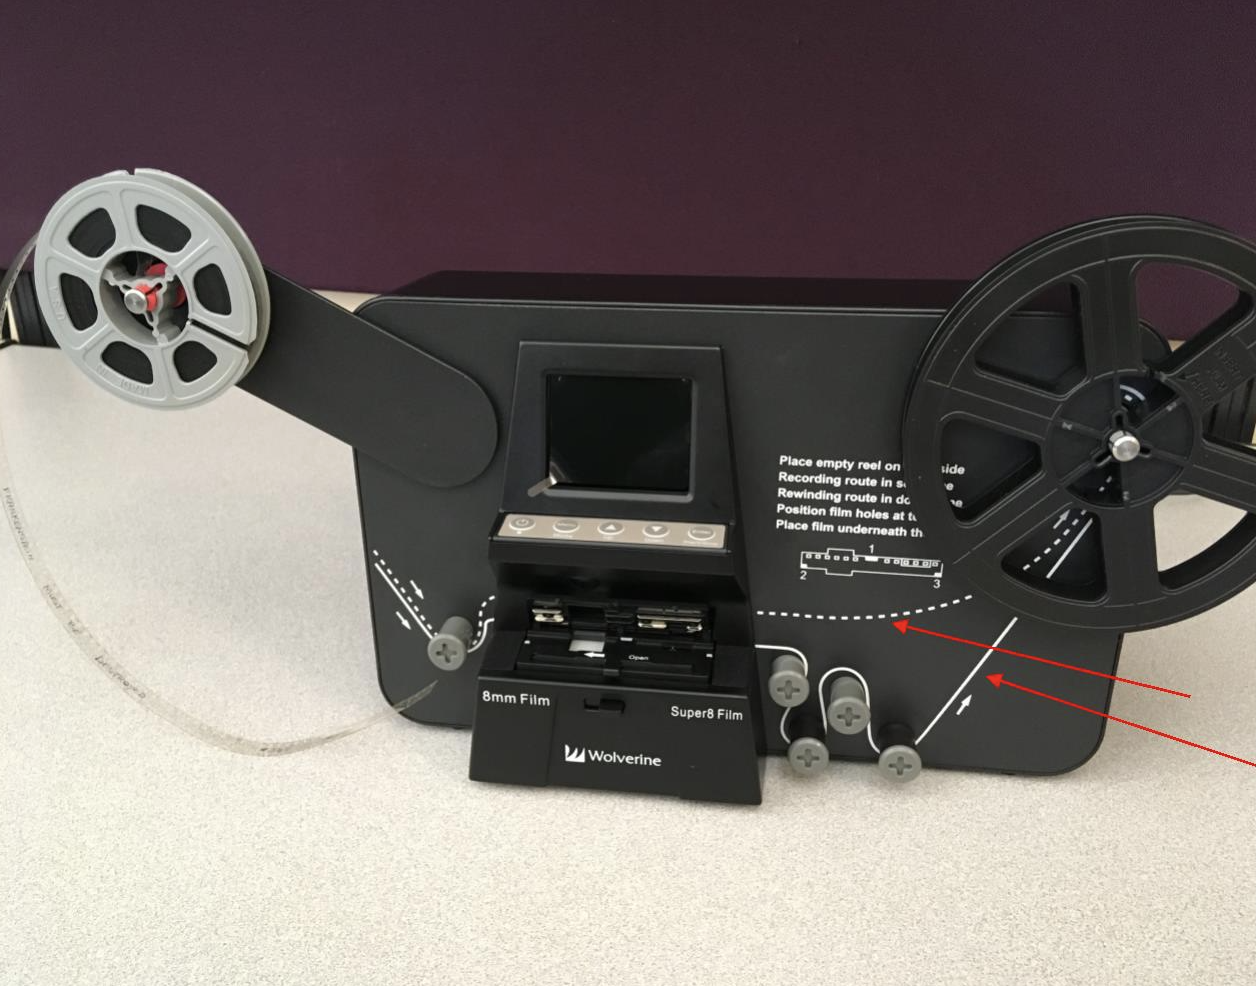
8. Note there are two film routing diagrams printed on the face of the MovieMaker-Pro (see red arrows below). The solid line represents how your film is to be routed for digitization. The dotted line represents how your film is to be routed to rewind the film back on to your film reel (we will touch on that later).
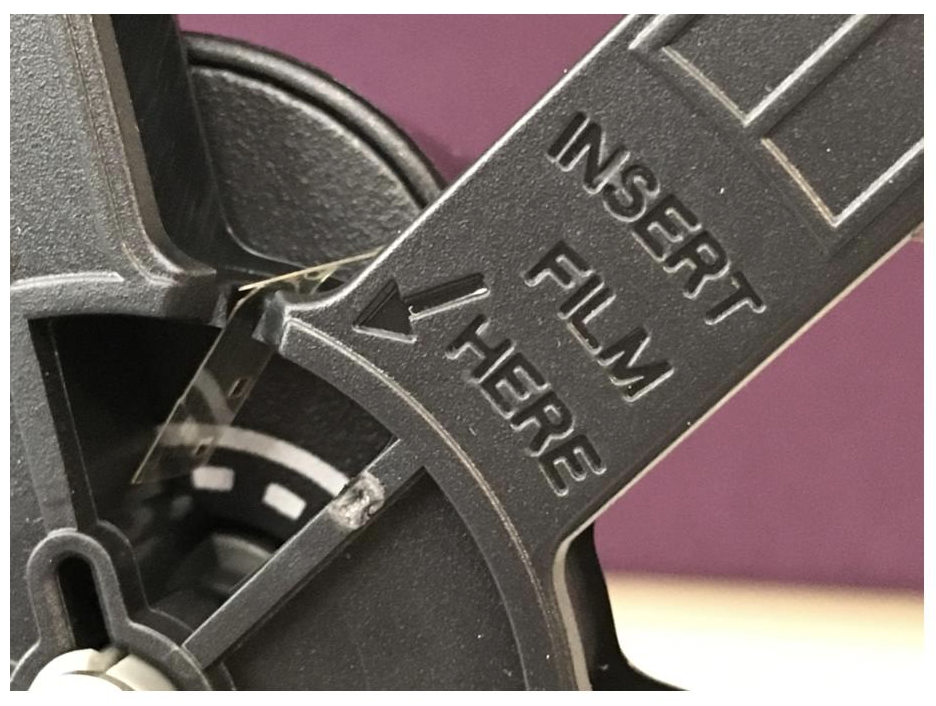
9. Before routing your film through the MovieMaker-Pro first pull the film over from the left reel and insert the end into the take up reel (as pictured below).
10. The picture below shows where you should be in the process so far. Note that the flap door is still open (circled in red).
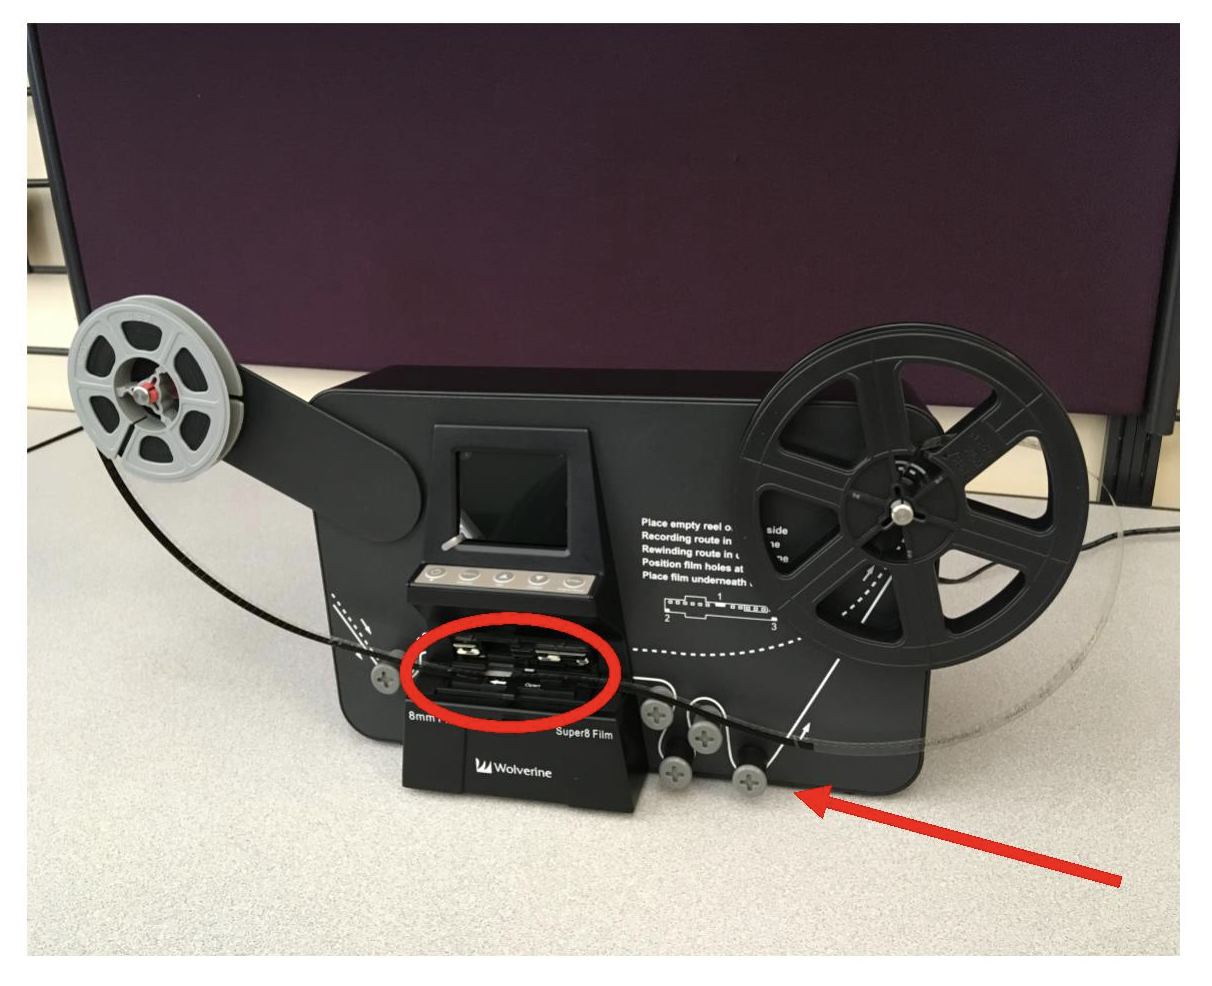
11. Now route the film around the four smaller sprockets as shown by the SOLID white line on the face of the MovieMaker-Pro (see arrow in pic above).
12. With the film routed properly around the sprockets and the flap door still open, position your film. Film sprocket holes should be at the top over the square glass window (as pictured below). Make sure your film is under the 3 white tabs (circled in red). Then close the flap door by pushing it down. The flap door will click into place.
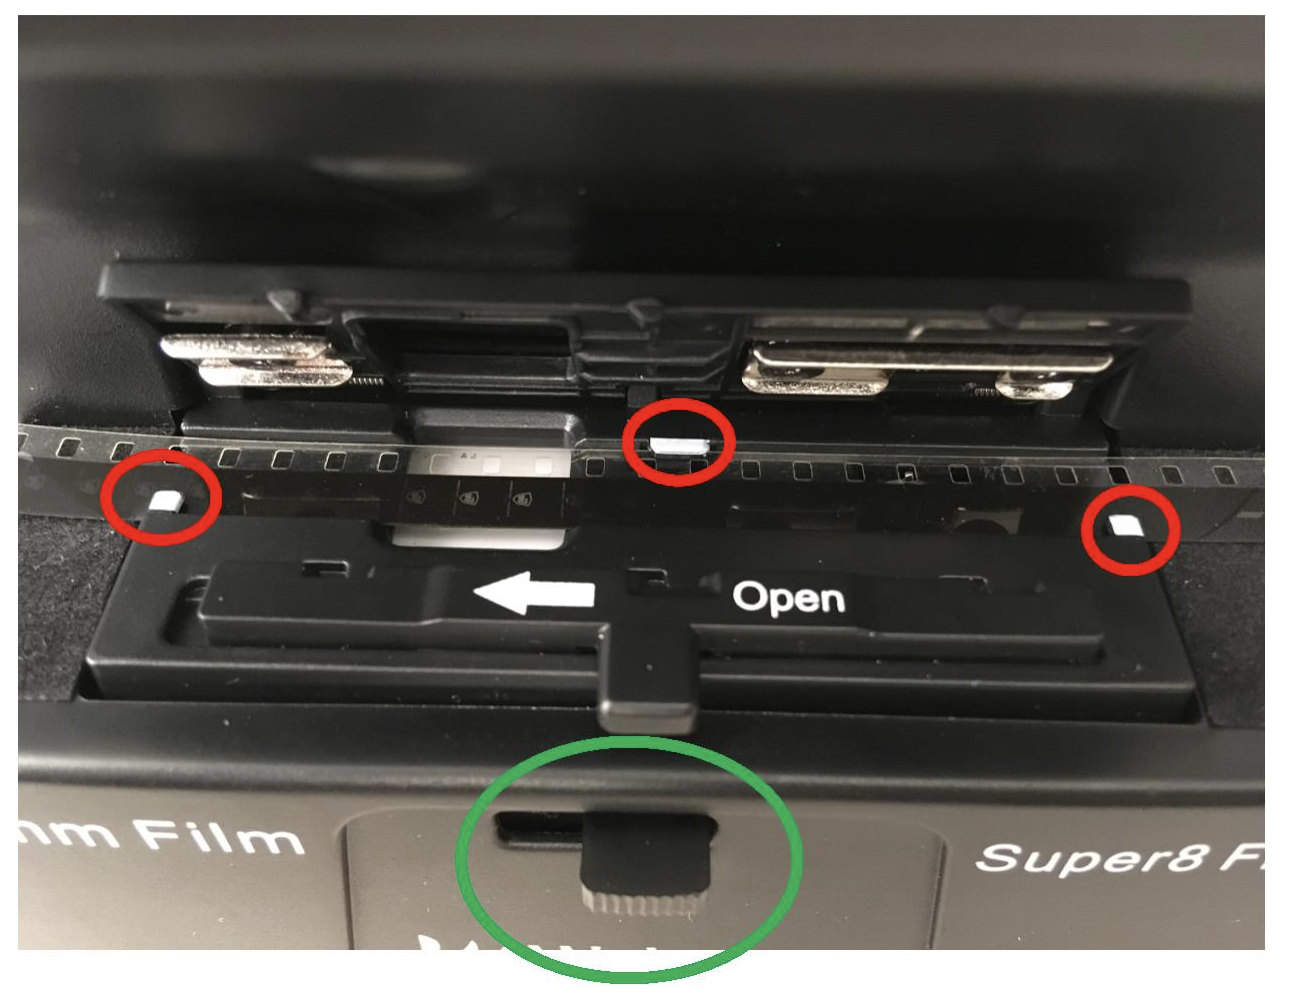
13. Now select 8mm or Super 8 by sliding the film selection button left or right (circled in green in picture above). Your film reel or the box it came in should note the type of film you have.
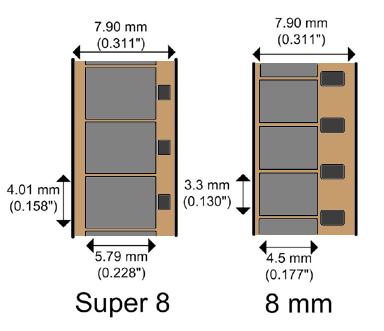
14. There are a few ways to find out the type of film you have. One way is to look at the film itself. Note the frame size on Super 8 is slightly bigger (see light grey squares in above image). Another way is to look at your film's sprocket hole size.
15. In the picture above you can see the dark grey sprocket holes for the 8mm are rectangular in shape. The sprocket holes for the Super 8 are almost perfectly square. Finally, the center hole on your film reel can tell you the type of film you're using. The center hole on Super 8 film reels is bigger than that on 8mm film reels. If you have to use the MovieMaker-Pro adapters on the shaft, your film is Super 8.
16. Press the power button to turn on the MovieMaker-Pro (circled in red below). The MovieMaker-Pro will remind you to select film type. If you already selected the film type you can move on to the next screen by pushing the Enter/Start/Stop button (circled in green below).
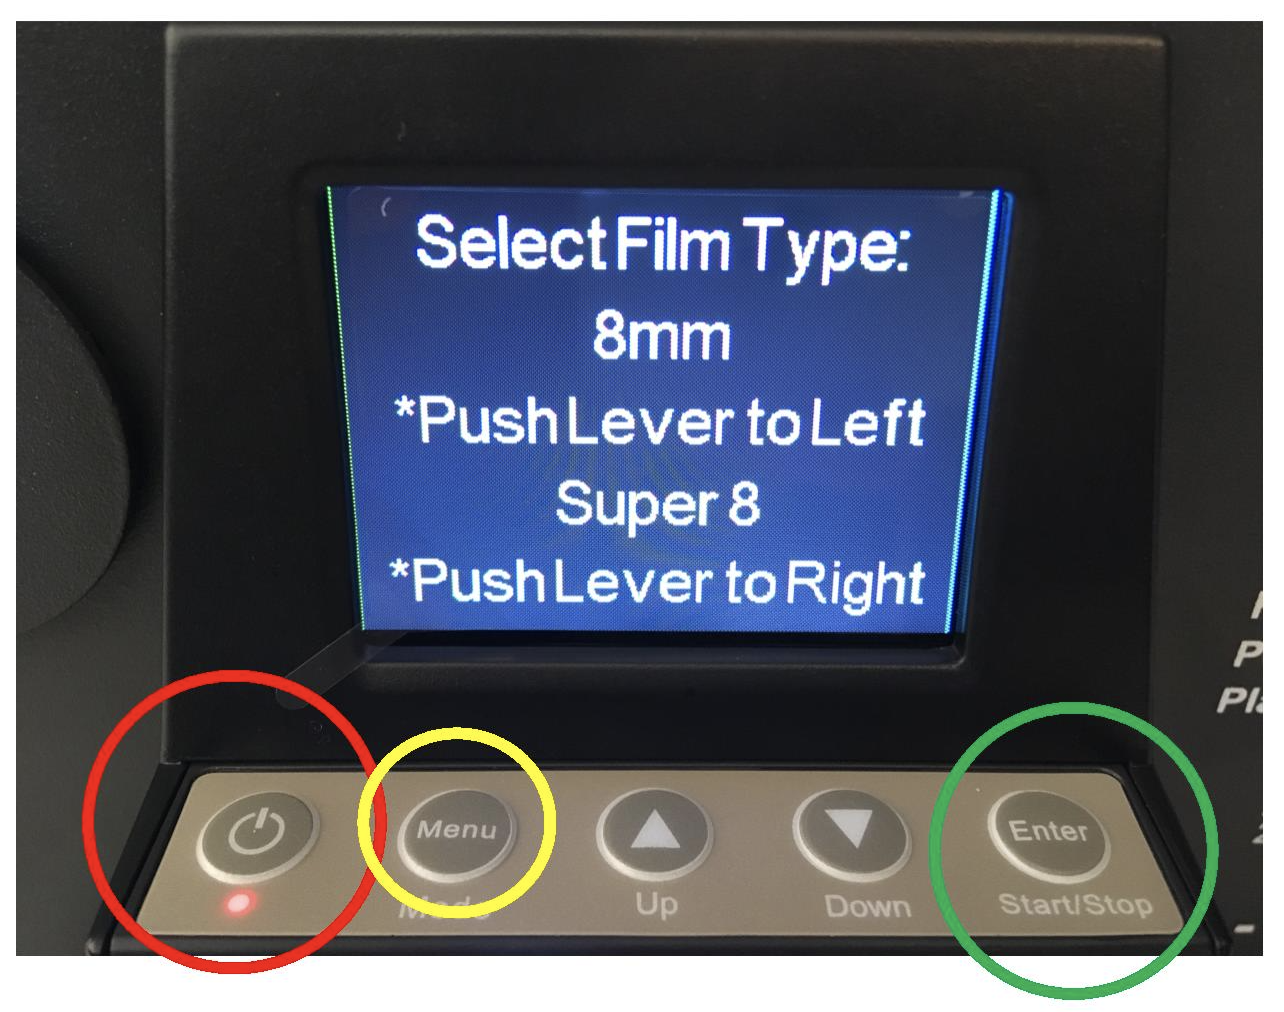
17. At this point you can also press the menu button (circled in yellow above) to make selections on various options such as language, exposure, sharpness and frame adjustment. If the default settings are fine, just press Enter/Start/Stop button (circled in green above) to begin the digitization process.
18. While recording is in process, a red dot (circled in green below) at upper left corner blinks.
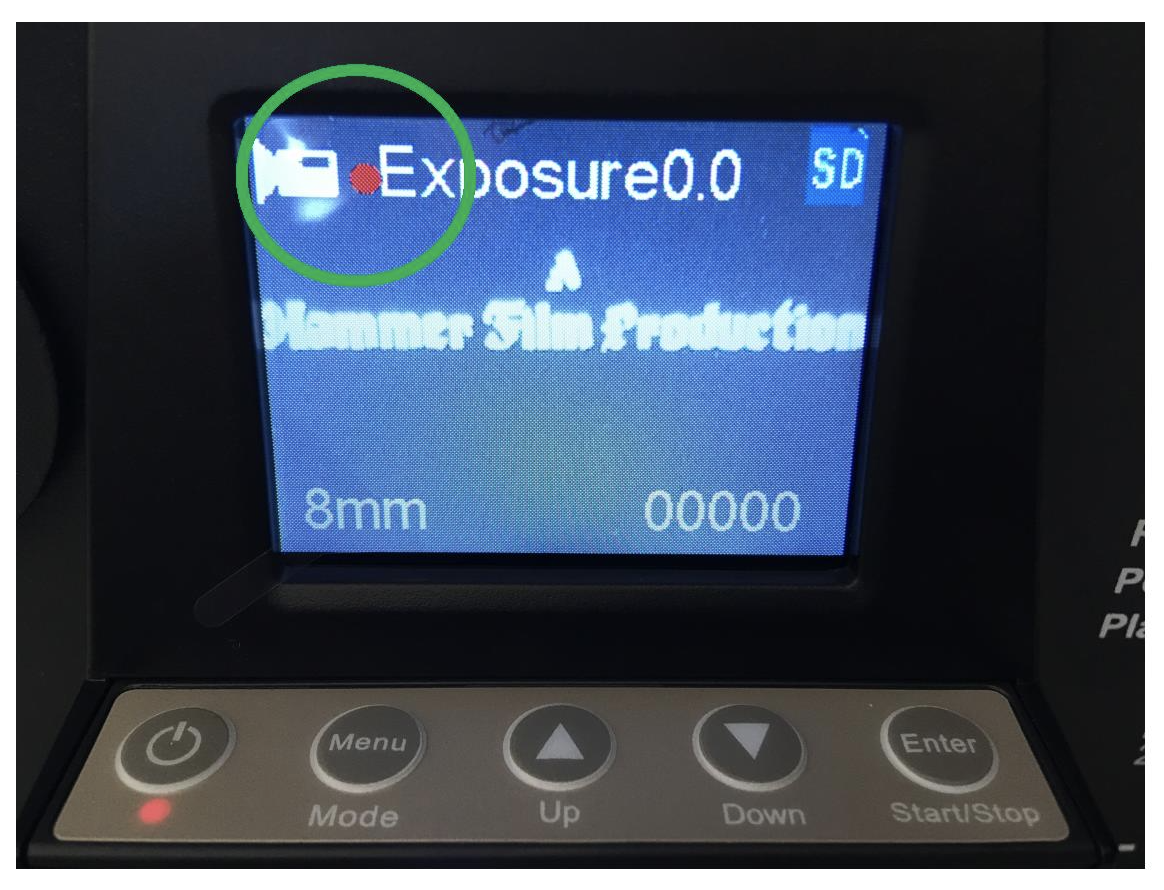
19. After the final frame of film has passed over the light table, press the Enter/Start/Stop button to stop digitizing. The image below is where you should now be in the process. As you can see your film is now fully on the take up reel and a digital copy of your movie is now on the SD card. The next step is to rewind your film back onto the reel you brought in.
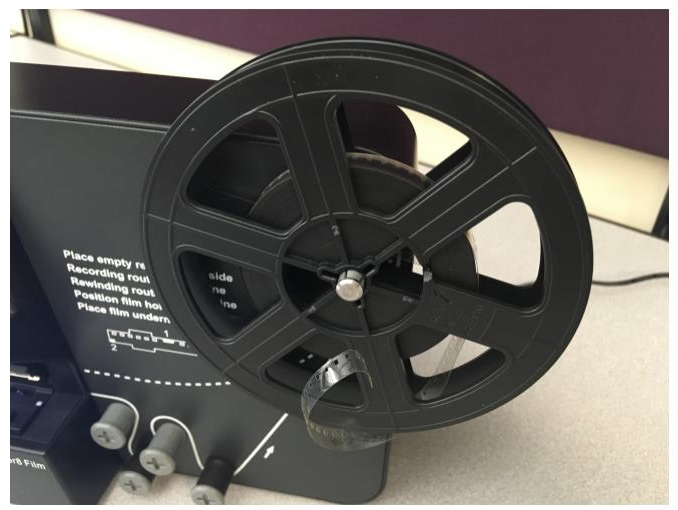
20. The MovieMaker-Pro does not run in reverse. To begin the rewind process you must first swap the reels on the MovieMaker-Pro (as pictured below). For Super 8 film use the grey adapter on the sprockets to ensure your film reel fits tightly (see step 7).
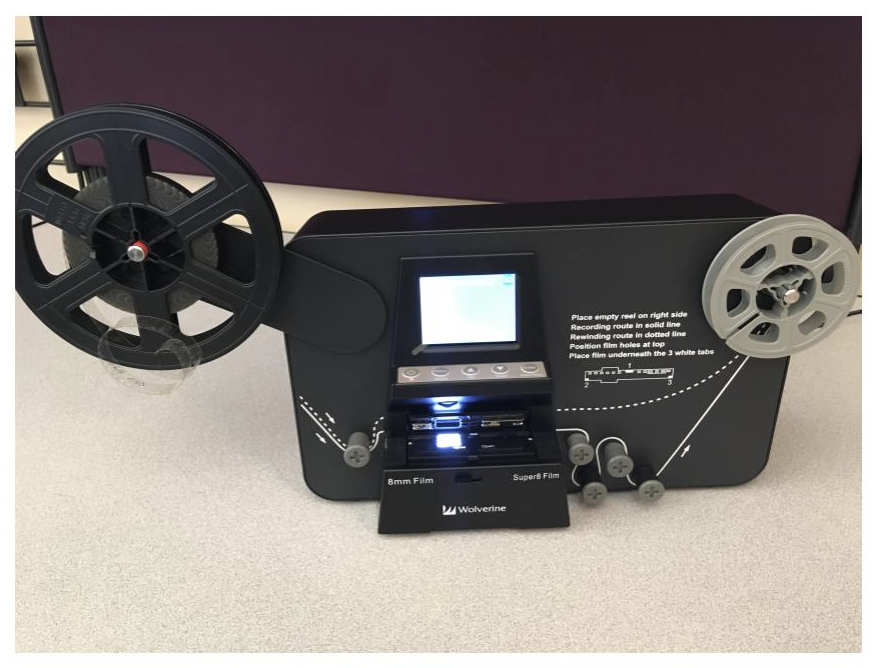
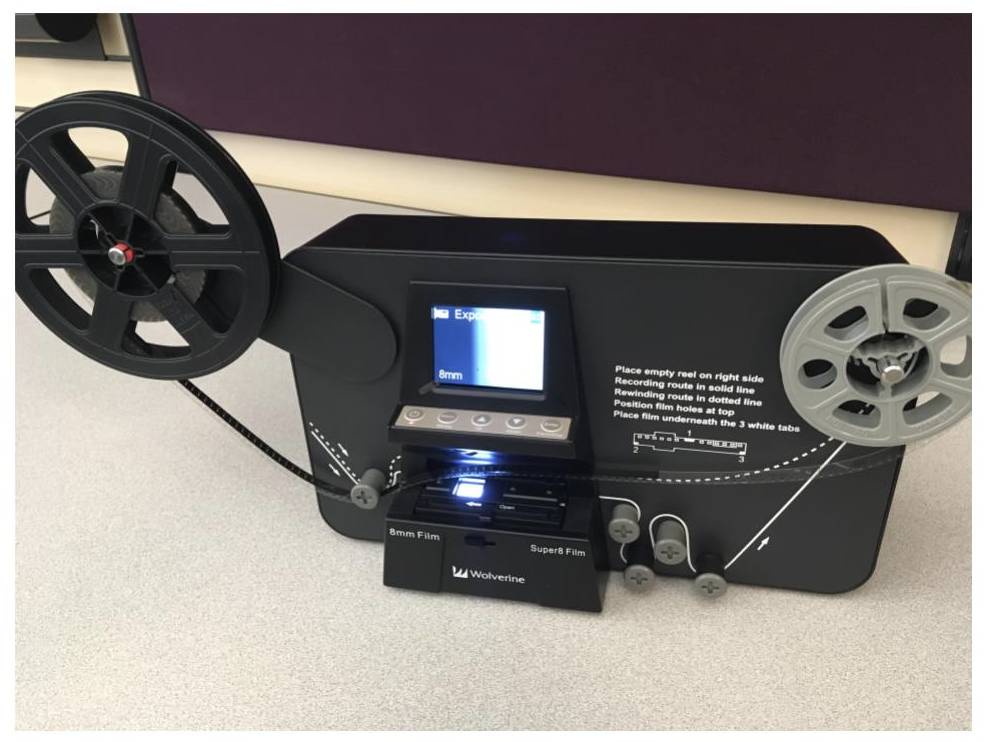
21. Now connect the film from the take-up film reel to your film reel. Follow the film rewind diagram (the dotted lines) printed on the MovieMaker-Pro. The image below shows where you should be in the process. NOTE: When rewinding, the film does not have to go under the flap door because you're not scanning anything, just rewinding.
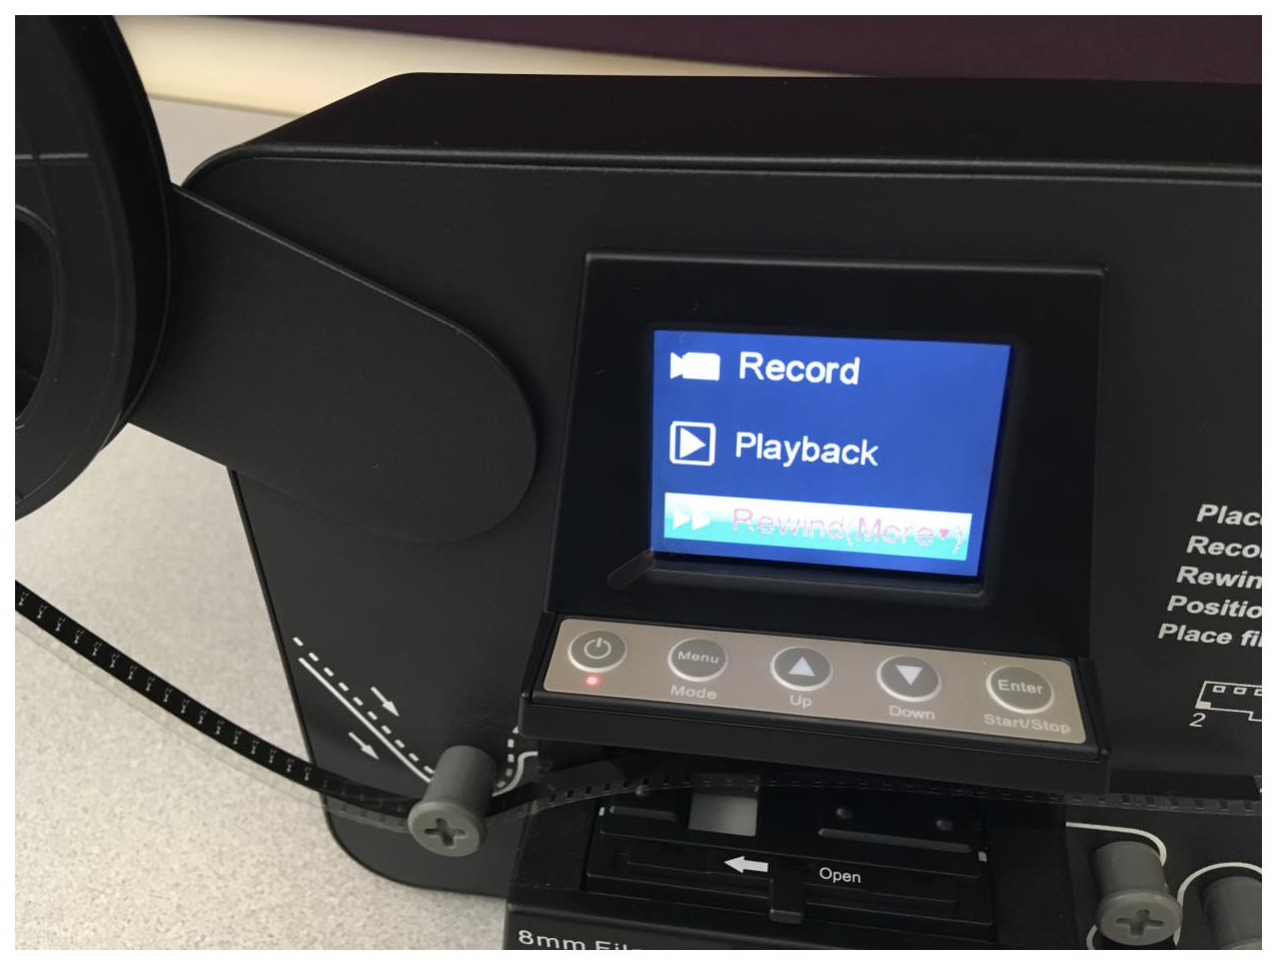
22. Now press the "Menu" button. Use the "Down" arrow button to highlight "Rewind" (as pictured below). Press the "Enter" button to start the rewind process. Stop the rewinding process by pressing the "Enter" button again.
23. After the rewinding has been completed you can remove your film reel from the MovieMaker-Pro and move on to accessing the MP4 file you just created.
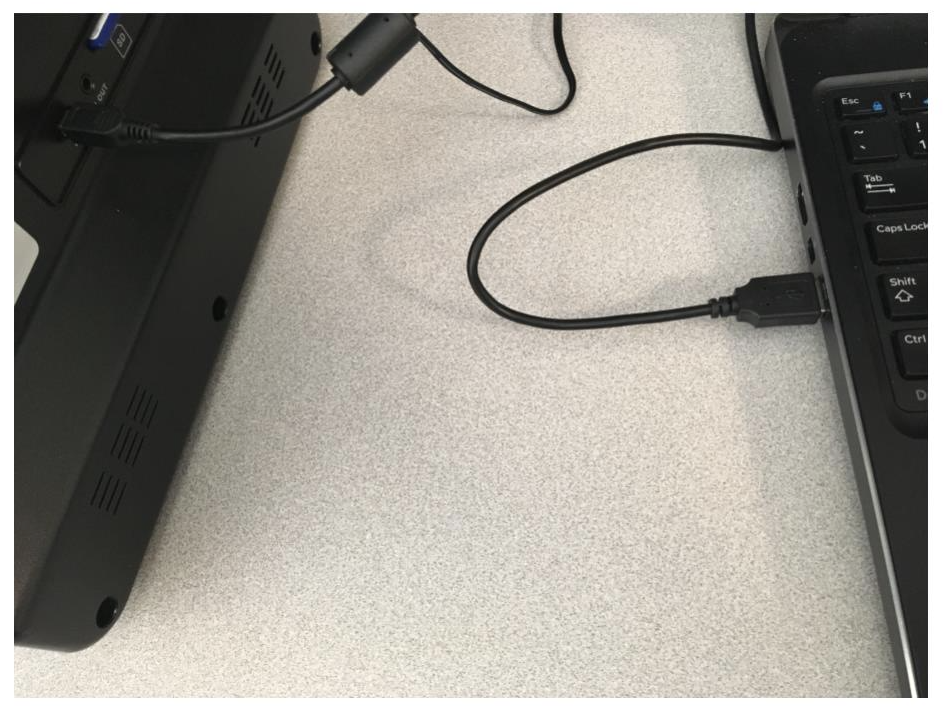
24. You have two options to access your MP4 file. One is to simply turn off the MovieMaker-Pro and then remove your SD card. You can then plug the SD into your own device for viewing. The other option is to plug the USB cable into the back of the MovieMaker-Pro and the other end into a computer’s USB port.
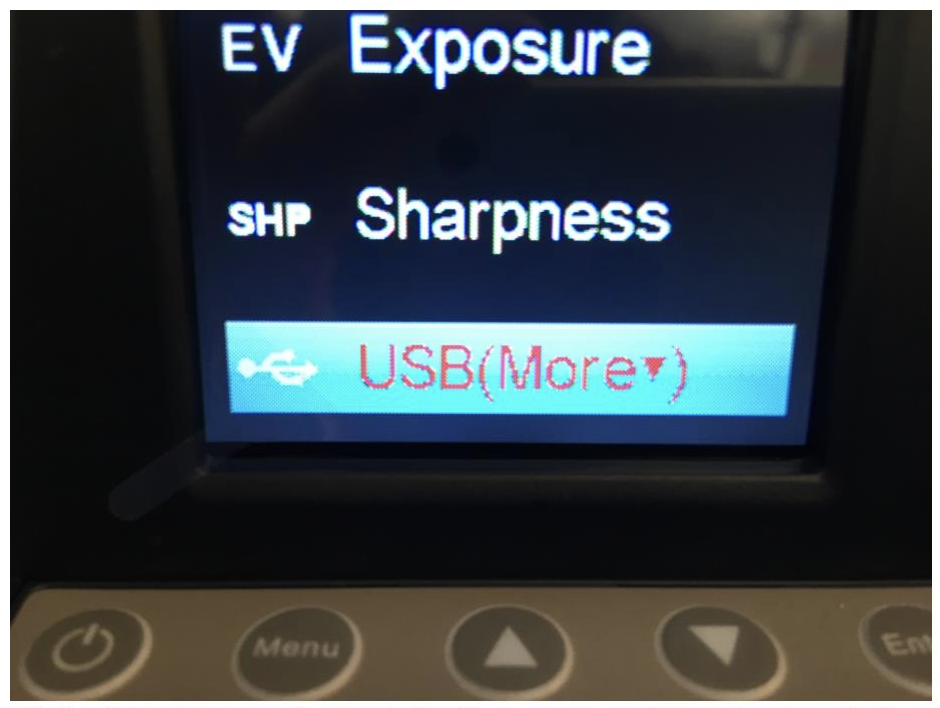
25. If you go with the USB option, push the "Menu" button on the MovieMaker-Pro. Use the "Down" button to scroll through the options. Choose "USB" (as pictured below). This will connect the computer to the MovieMaker-Pro's SD memory card.
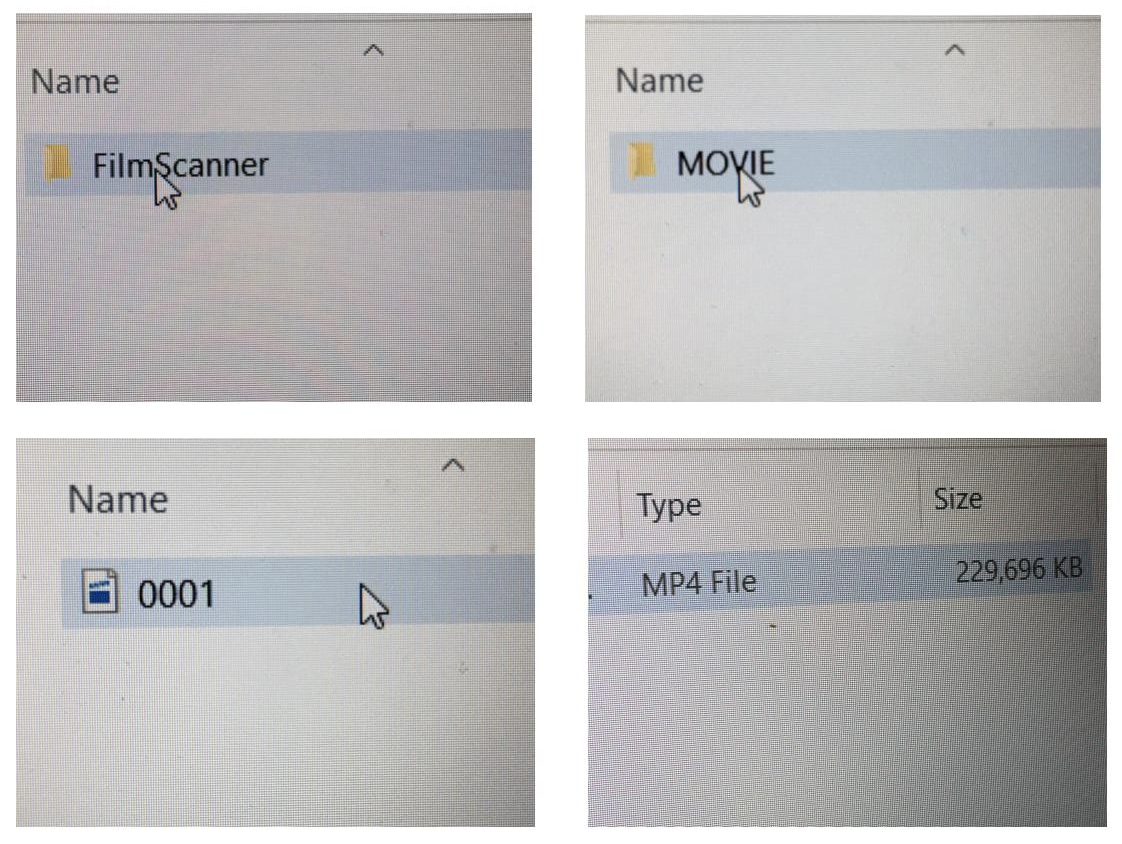
26. The SD memory card is recognized by the computer as an external drive, called “NO_NAME.” After clicking on this "drive" you will find your MP4 file in the “Film Scanner/MOVIE” directory (as pictured below).
27. You have the option of moving these files to a computer or to a flash drive. These files can be played via the video software on your computer (Quicktime, VLC, etc) or you can burn the MP4 file to a DVD disc.
That's it! You're all done!
Troubleshooting
Q. My film has imperfect splices, the film is bent, or has broken sprocket holes, and it is stuck and won’t advance through the machine.
A. Open the flap door while the film is stuck. Let the problem frames advance and clear the track table, then close the flap door and continue to record.
Q. Why won’t my film go through the MovieMaker-Pro?
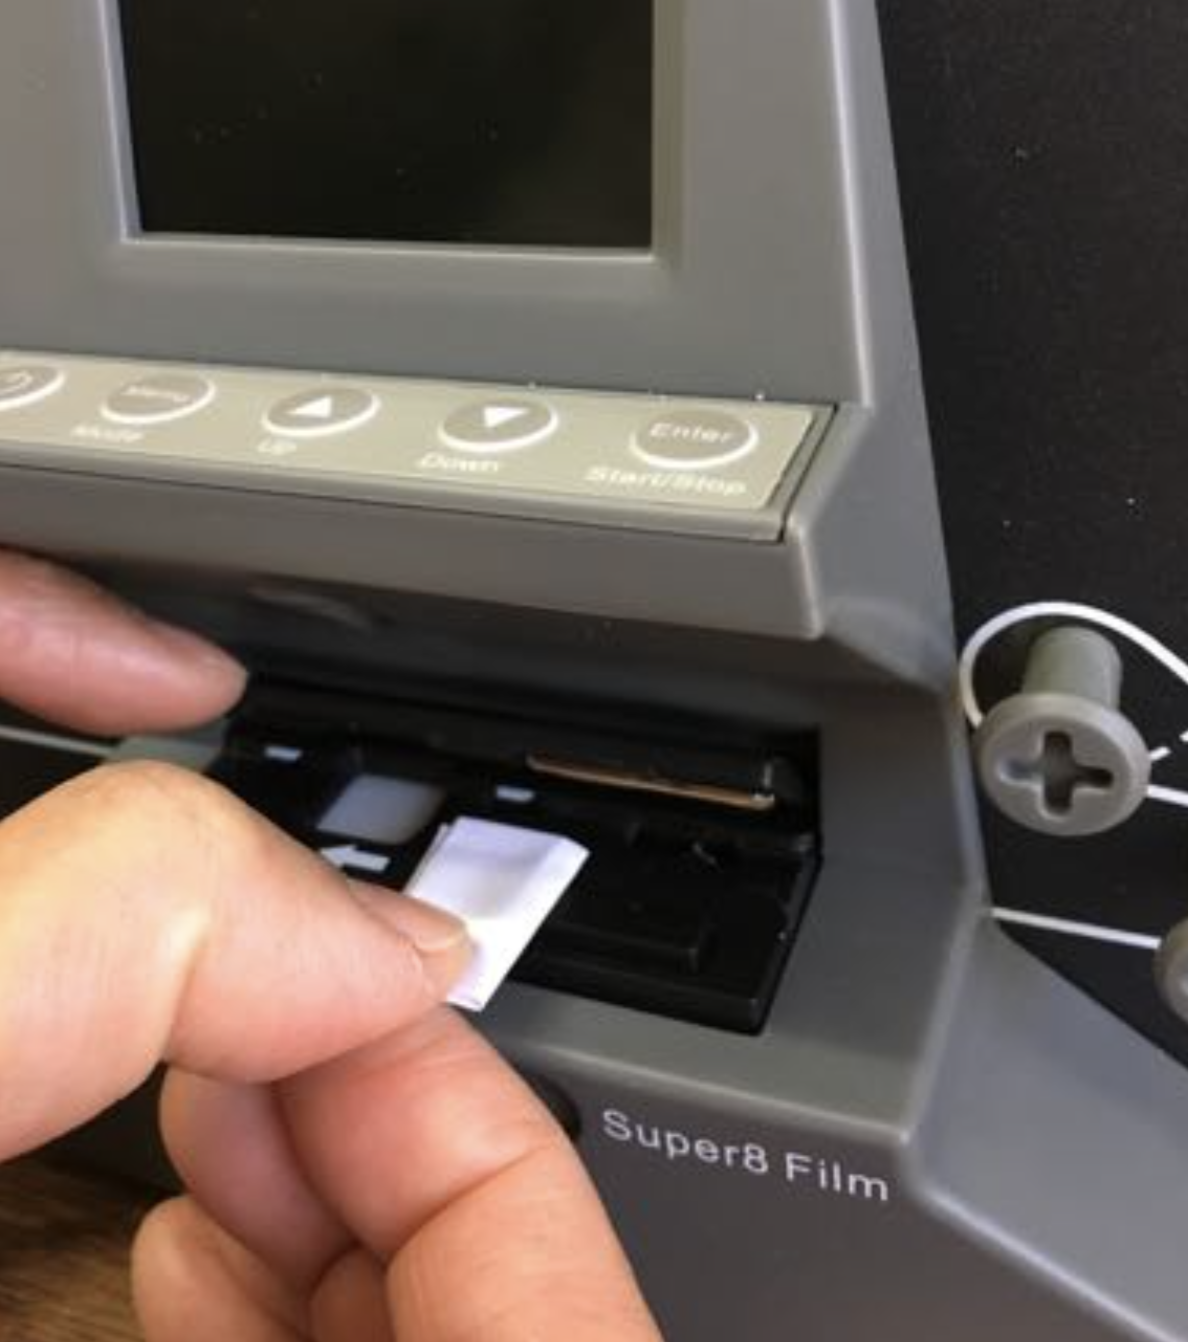
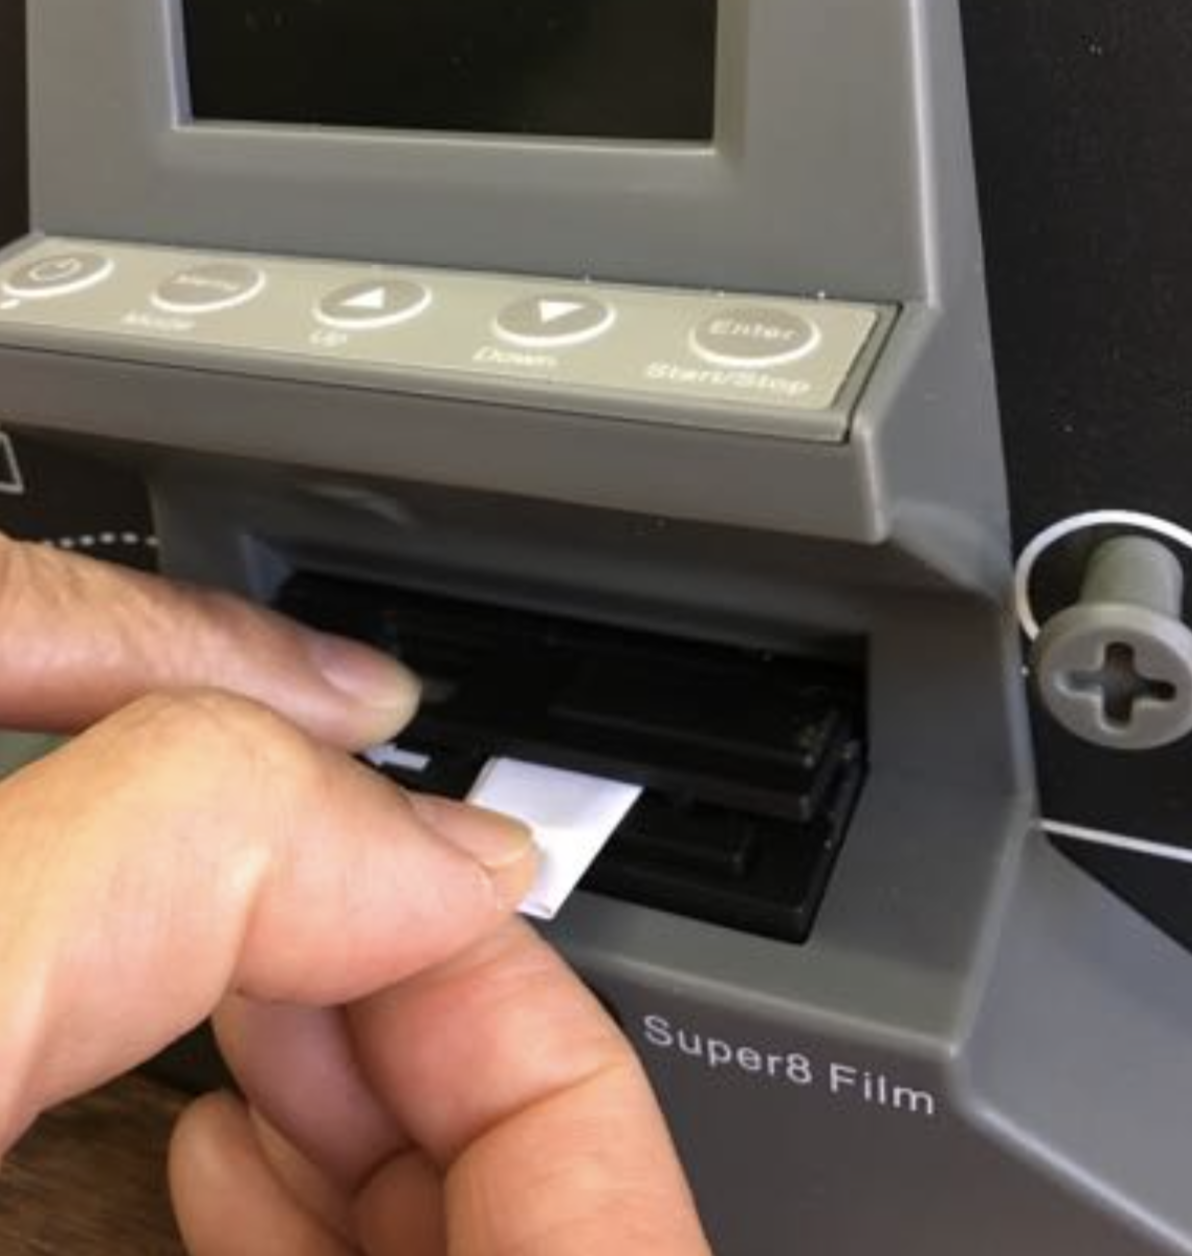
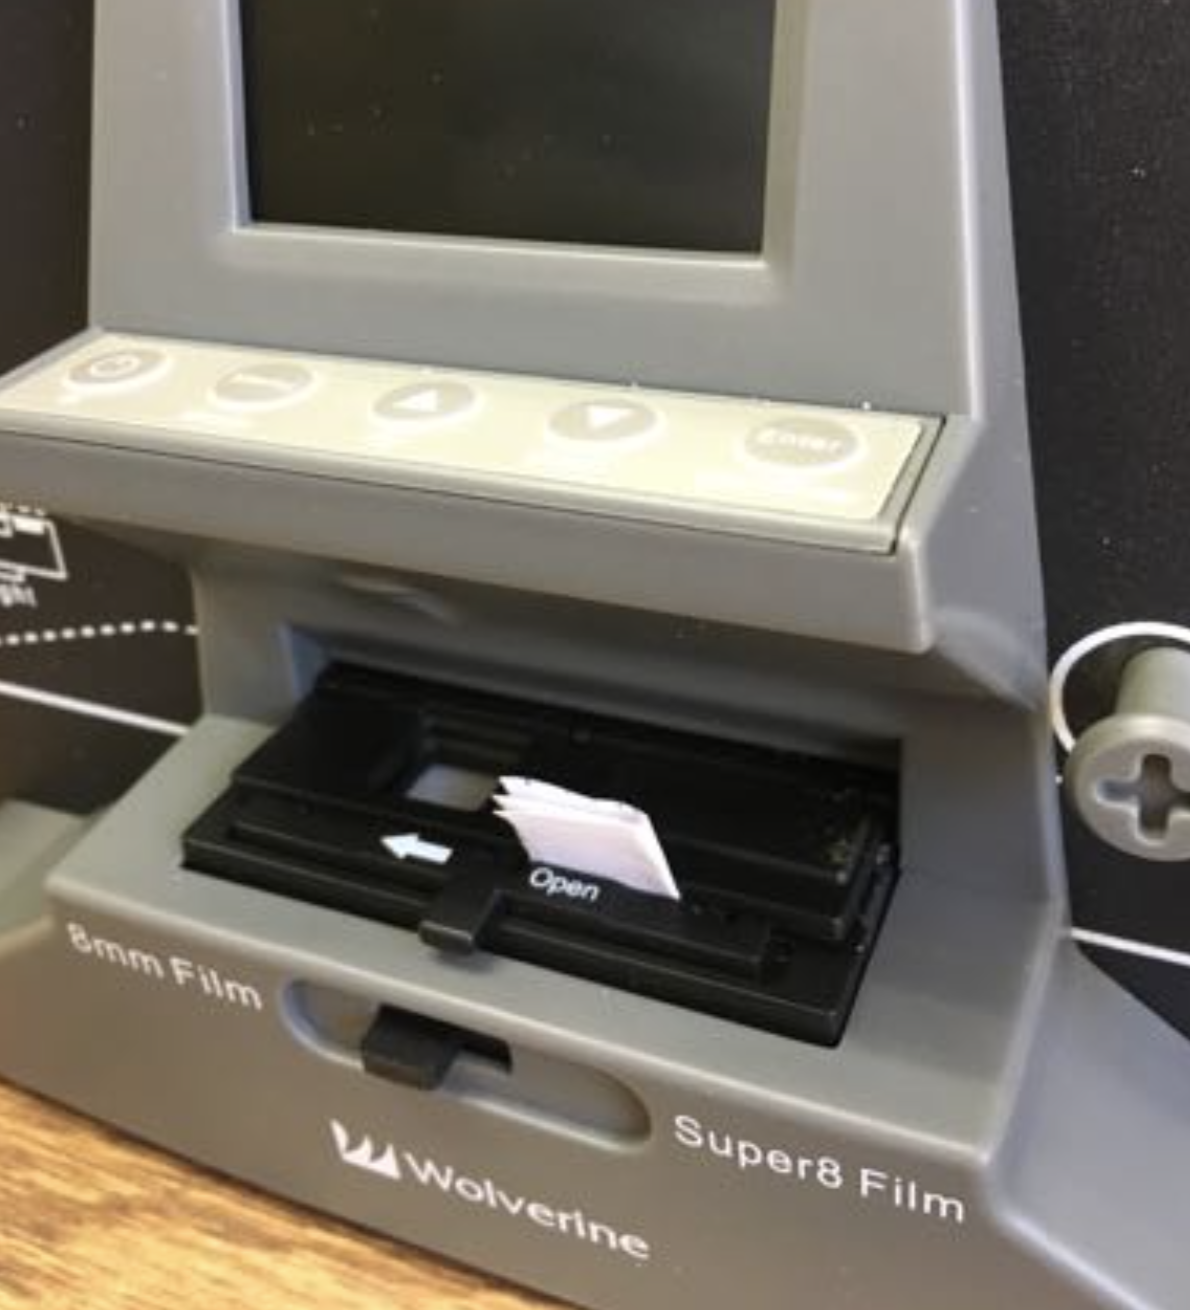
A. Some old film, split 16mm or Super8, came out a little wider than 8mm, or it may have expanded at some sections due to age. For these reasons the unit will have a hard time pulling the film from its sprocket holes. A work around for this issue would be to get a small piece of paper 1x1.5 inch, fold it four times and wedge it between the edge of the flip door and the track, as shown in the images below, to keep the door from closing all the way.
Q. How do I adjust the image or video date?
A. The MovieMaker-Pro does not have a clock and the date is an arbitrary date. You can change the date when you import the images/videos to the computer. For instance, you can rename the MP4 file using the current date.
Notes
- Please see the MovieMaker-Pro User Manual for additional information regarding exposure, sharpness and frame adjustment (pgs. 9-10) MovieMaker_PRO_V_3.0_Manual_
- Please see the MovieMaker-Pro User Manual for additional information regarding specifications (p.10) MovieMaker_PRO_V_3.0_Manual_


Add a comment to: Digitizing 8mm & Super 8 Films with MovieMaker-Pro